SSL means that the data transfer between a user’s web browser and your web server is encrypted. This can be seen in the “https” in the URL bar in your browser. It is easy to teach your WordPress blog to speak SSL:
- get an SSL certificate for your website. You can get it from your web hoster
- check that the SSL certificate actually works
- tell your WordPress blog that it must speak https now
- enforce SSL: redirect http to https
- fix mixed content
Getting an SSL certificate
The first thing to do is to make sure that your website has an SSL certificate. In non-technical words this is some kind of digital footprint or digital seal.
Your website hands it to the browser so that the browser can encrypt all communication with your website.
At the same time this certificate proves that your website is actually the website it claims to be. For this your certificate itself needs to be signed by a higher authority than your web server. There is a small number of “root certificates” that a web browser trusts. All SSL certificates eventually need a signature by these authorities.
When you ask your web hoster to give you an SSL certificate, your web hoster does all the technical stuff for you and gets this signature for you. In order to do this your web hoster needs to check that the website is actually yours. This is easy, because your web hoster already knows you. But he does have to promise to the root authority of the SSL chain that he really knows you.
Installing your SSL certificate should be highly automatic. Your web hoster has this somewhere in the domain administration. In most cases it is one or two clicks there. I cannot give you screenshots for your web hoster as I do not know which web hoster you are using. But if you google for your web hoster name and ssl you will certainly find exactly what to do.
Some web hosters charge extra for the SSL certificate. Or they give you a free one for your first domain and charge you extra for a second SSL certificate for your second web domain. By month! This was reason enough for me to change my web hoster some years ago. They shouldn’t charge you, because thanks to the Let’s Encrypt initiative SSL certificates are for free.
Check that the SSL certificate actually works
After installing the SSL certificate you can reach your WordPress blog at https://example.com. Before that you could only reach it at http://example.com.
If this does not work then please check your domain setup. If all else fails ask your web hoster for help.
Make sure that your WordPress blog knows that it must speak https now
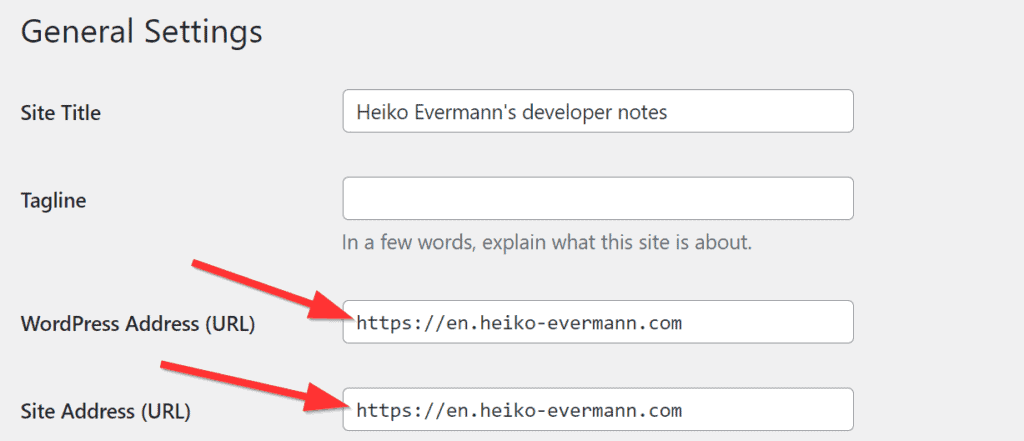
There is an important place in the WordPress settings that you now have to change. You can find it in the WordPress dashbord in “Settings/General”:

If you do not change this to https then this is what happens:
You go to https://example.com and this page now displays fine, but all internal links in the website still go to http://example.com. That means: as soon as the reader clicks a link, he leaves the secure connection.
This would not be what you want. So please make sure to get these settings correct.
Enforce SSL: redirect http to https
What we have so far is this: when a reader visits your site directly using https, then everything is fine. But when he visits http://example.com you want him to go directly to https.
So you want your web server to gently tell the browser:
“sorry, you are wrong here, please go directly to https://example.com”.
There are several ways to do this.
The easiest way: use your domain settings: Maybe your web hoster already has a switch. At all-inkl.com that I use for some websites, there is a simple click in the domain setup just next to “activate SSL” that states “enforce SSL”. In this case that is all I have to do.
Other web hosters might not offer this simple support. In this case you have to do it yourself. You then have two options:
Tinker with the file “.htaccess”: This file contains very basic settings of your web server. There is some code that you can add in this file that does the trick. This however is a very technical thing to do and if you are an average WordPress user this might be a bit difficult. I don’t want you to break your web server, so I will not tell you how to do this. If you are well-versed in web servers, you alredy know and you wouldn’t be here. If you are not, you probably shouldn’t.
Use a plugin: There is a simple plugin that does the trick. It is called “Really simple SSL”. You can find it here . And yes, I do know, it is one more plugin and you want to keep the number of plugins low. And yes, I do know that computer geeks will frown on you. But it works very reliably for millions of WordPress installations.
So if your web hoster does not allow you to enforce SSL with just one click, this is the way to do it. At least that is my opinion.
fix mixed content
What do we have now: So far we have SSL working and the internal menu structure of WordPress is clean: it uses https. But if you have written web pages before switching on SSL you might have some links in your articles that refer to other pages in your blog. You might have embedded images that still use http. Now it is time to fix this.
Again there is more than one way to do it.
If you use the “really simple SSL” plugin, things are really simple. Just keep “mixed content fixer” checked and everything is fine. When your web post links to http://example.com/somearticle, then this plugin automatically changes this to https://example.com/somearticle in the output. It does not change it in the article, but when the page is sent to the web browser then all http links within your site are silently changed to https.
The other way is to use the plugin “better search replace” and to update all “http://example.com” to “https://example.com”. So far I have not done this. I have been happy with the “really simple SSL” plugin. The only downside is that you always need an extra plugin. The advantage is that with “really simple SSL” you are done and can concentrate on creating more content for your blog.
The choice is up to you.
Checking redirects
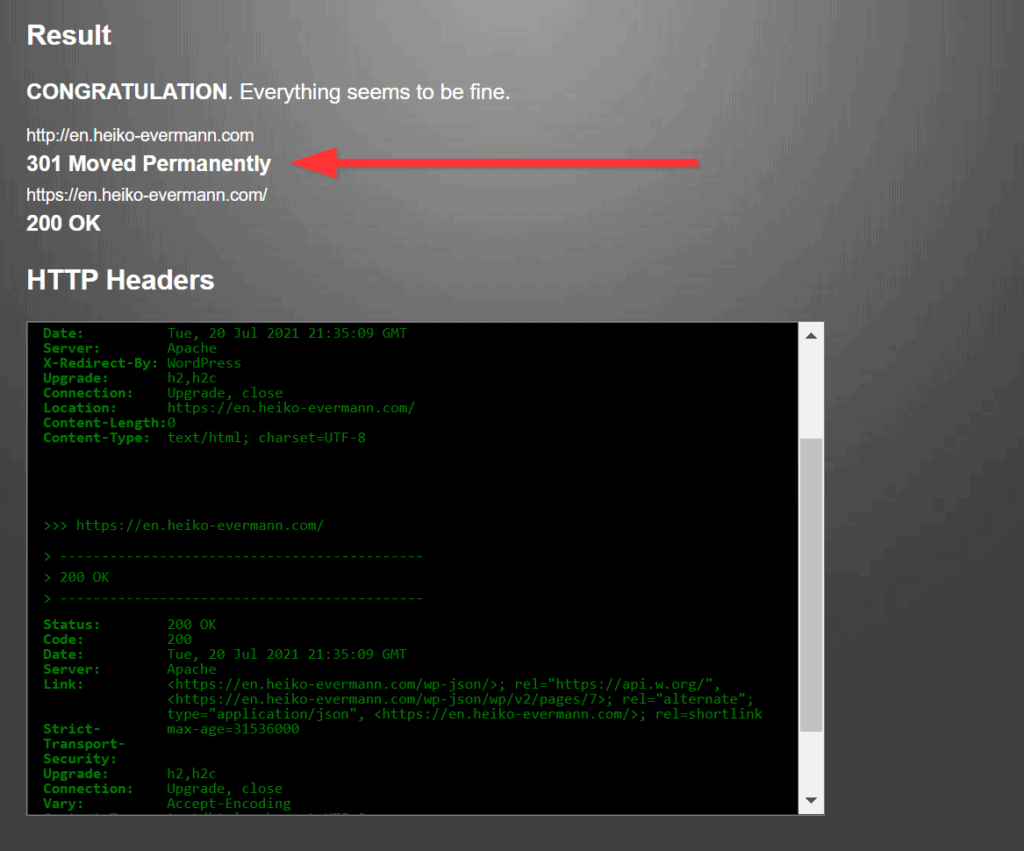
If you want to see the redirect from http to https in action there is an easy way to do this online:
Go to https://www.redirect-checker.org/
So when I put http://heikoevermann.com in there, this is what I get: a request without SSL is directly forwarded to the https version.

The summary is in the first lines. The technical details are in the text window.
Have fun.
