

SAP provides over 1000 icons ready for use. Here you will find sample code for the most important use cases, including ALV lists, dialogs (dynpros), selection screens and report outputs.
Finding icons
In order to use icons in your own programs, you need to know the icon code or the icon constant, e.g. “@01@” or ICON_CHECKED.
Two SAP standard reports are available for viewing icons: RSTXICON and SHOWICON. Use the transaction SE38 to start them. The output is similar in both. Another alternative is to direct display the content of table ICON in SE16. Below is a direct comparison of the three options. In my opinion SE16 is the most helpful option.
The standard report RSTXICON
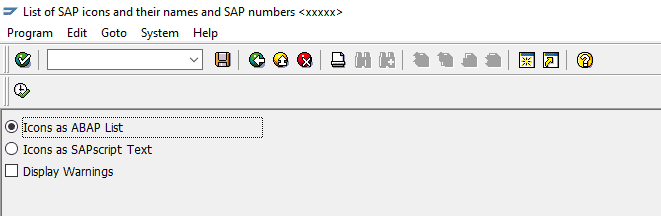
This is the selection screen of RSTXICON:
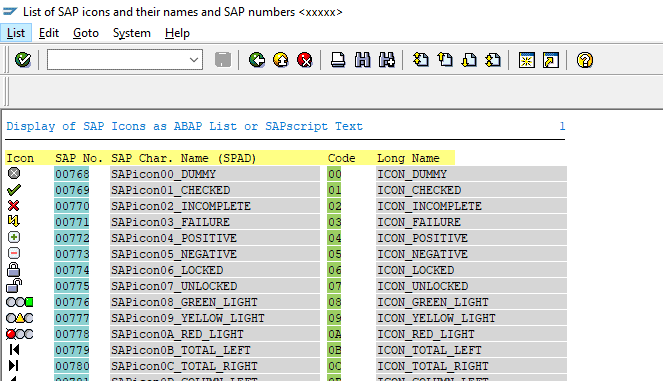
This is the output of RSTXICON:
The standard report SHOWICON
This is the selection screen of SHOWICON:

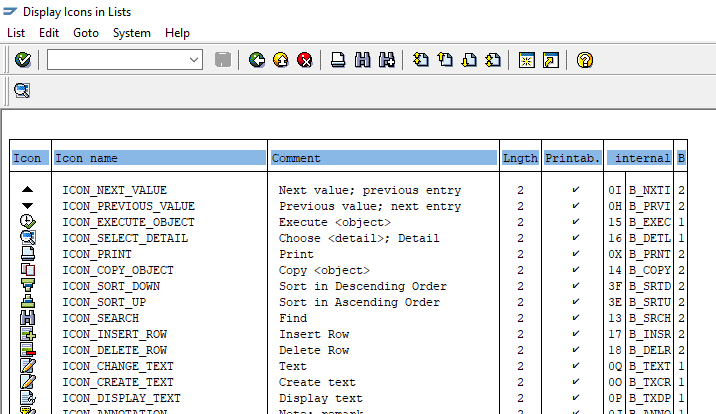
This is the output of SHOWICON:
Direct table display via SE16 of table ICON
ICON
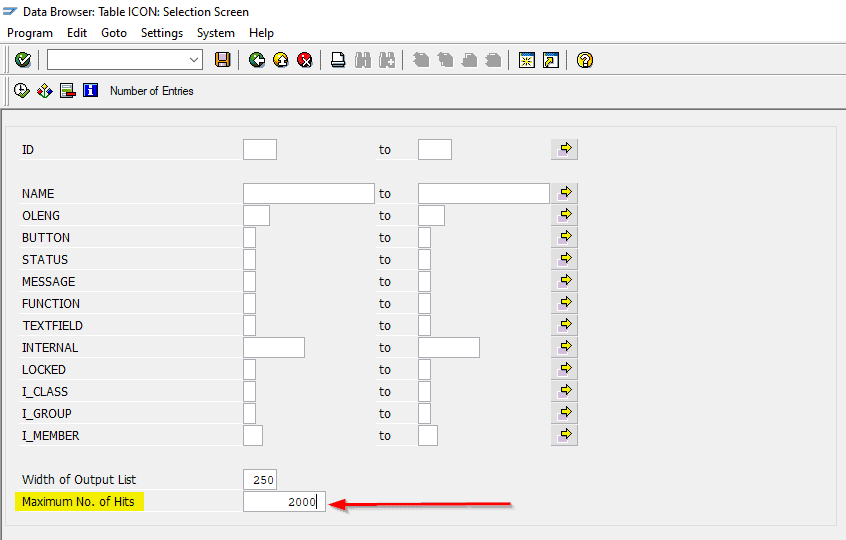
This is the selection screen of transaction SE16 for the table ICON. Please keep in mind to change the max number of output lines. You might want to see all 1000+ icons.
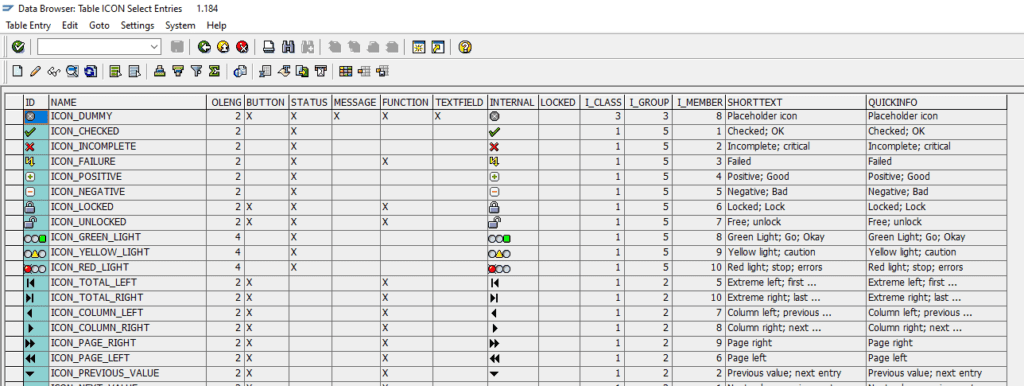
This is the list output of table ICON in SE16:
Let us compare these three methods: which one is the easiest way to find an icon code?
Via the reports?
All three ways list all the icons. But in the end, you will want to copy an icon code or an icon constant. In the case of the reports you will have to tinker with CTRL-Y and a careful mouse selection in order to get that part of the output into your copy/paste buffer.
Via SE16
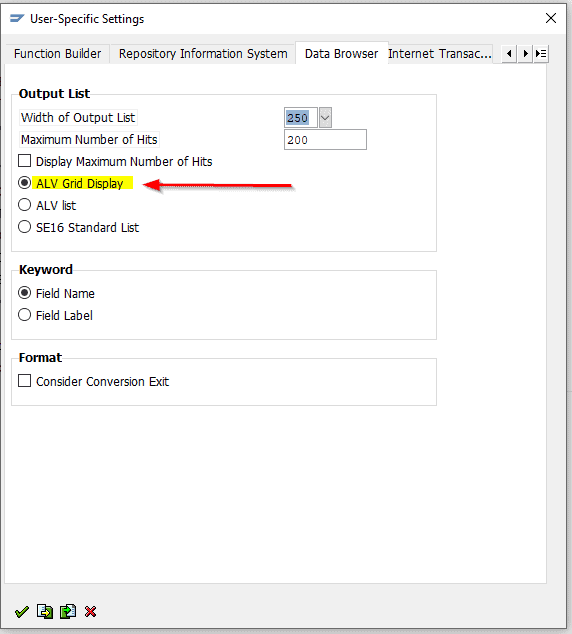
In comparison to that, table display via transaction SE16 is a lot easier. At least if you have your table output set to ALV grid. (In case you do not know this hack: open SE16. Then in the selection screen (before actually displaying table content) go to menu/settings/user parameters. There you pick „ALV Grid Display“. In SE16 this choice always is the most helpful one.)
Now, in the grid output of SE16 you simply click on a cell with your mouse and then you press CTRL-C and you are done. This works with both, the 4 character icon code and the textual icon constant.
Finding icons by name
SAP has more than 1000 icons and you can scroll for quite a while to view them all. Here also, SE16 offers a quick solution. Assume you are looing for an arrow icon pointing left.
In SE16 you simply input “*LEFT*” as icon name and you get this short list:
So you see that ICON_ARROW_LEFT is the icon you were searching for and you are done.
This is not possible with the standard reports for icons.
In which table are SAP icons stored?
All the icons can be found in table ICON. The corresponding text table ICONT holds desciptions in several installed languages. Here is the table definition from SE11:
These are the most important columns of table ICON:
- ID: typ icon_d, a character string of length 4. Attention: se16 for table ICON will directly show the icon, i.e. the image. When you copy the cell, you will copy the 4 character string.
- NAME: this is the constant that you should use in your ABAP code. You can also use the 4 character ID directly, but the code is only readable (for yourself and for your team) when you use the textual constant.
- OLENG: the output length for printing. When you compare it with text output: Most icons are 2 characteres wide, but some warning icons are larger (4 characters).
- Button, status, message, function und textfield are flags indicating that the icon can be used for this purpose. SAP code checks this in various places, e.g. using an icon in a button that is not marked as button icon might not work. You can check this condition easily in your own code: use the function module ICON_CHECK. Input is the icon code plus a list of intended uses. The result is ok only if an icon with this code exists an if at least one of the uses that you asked for is valid.
- I_CLASS, I_GROUP, I_MEMBER: these are groupings used in the official SAP icon guideline in https://experience.sap.com/files/guidelines/icons_sap/index.htm
 There you find a comprehensive explanations about the intended use of the SAP icons. If it is important to you to build masks in a way that is consisten with SAP use, then this document is worth having a look.
The data type for SAP icons
The SAP domain for icons is ICON (what a surprise…). This is a 4 character field. Several data elements refer to this domain, e.g. ICON_D. This is the one used in the table ICON. This data element should work for most of your use cases.
Using ICON constants in ABAP
The icon constants that you can see in SE 16 are definied in a type pool. You can include it via
include <icon>.
or via
type-pools: icon.
Unfortunately auto complete for the icon constants does not seem wo work, neither in SE38 in the SAP GUI nor in the ABAP editor in Eclipse.
Using icons in selection screens
You can use icons directly in selection screens. It is sufficient to use the @-code in edit mode:
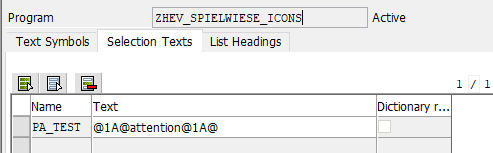
In Display mode the icon is already visible:
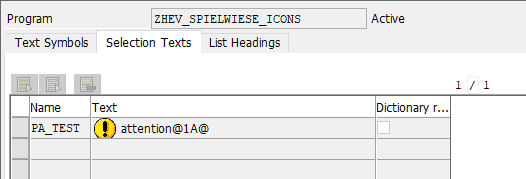
The icon will also show in the selectin screen at runtime:
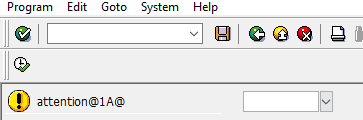
As you can see this only works if the icon comes first in the string. If you need to put the icon anywhere else you have to use tricks like selection screen comments etc.
Output of icons in reports
You can output icons directy with a write command. But again, the icon must come first in the string, ot you will see the @-code as string. If you need an icon inbetween then you have to use several write commands or you have to separate the parts with comma.
lf_icon = icon_okay.
write : / lf_icon.write : '@0V@ Test', '@0V@'.
The output looks like this:
Using icons in an ALV list
Icons can also easily be used in ALV lists. You simply define use an icon data element for the column. Then the ALV list does all the rest automatically. Here is an example:
- First we define a structure for the output: an icon and something else for the sake of the example. In this case a custumer number.
- We also define a corresponding table type and initialize variables of these types.
- We fill two rows of sample data with an icon and a customer number.
- The rest of the code is standard for setting up an ALV list in order to display an internal table as a grid.
This is the output:
Here is the complete code:
REPORT z_icons_in_alv.

TYPE-POOLS: icon.


TYPES: BEGIN OF ts_sample,
         icon TYPE icon_d,
         kunnr TYPE kunnr,
       END OF ts_sample,
       tt_sample TYPE TABLE OF ts_sample.

DATA: lt_sample TYPE tt_sample,
      ls_sample TYPE ts_sample,

      lc_alv            TYPE REF TO cl_salv_table,
      lr_functions      TYPE REF TO cl_salv_functions_list,
      lr_columns        TYPE REF TO cl_salv_columns_table,
      lr_display        TYPE REF TO cl_salv_display_settings,
      lf_listname       TYPE lvc_title,
      lr_layout TYPE REF TO cl_salv_layout,
      ls_key    TYPE salv_s_layout_key.


ls_sample-icon = icon_okay.
ls_sample-kunnr = 47110815.
APPEND ls_sample TO lt_sample.

ls_sample-icon = icon_cancel.
ls_sample-kunnr = 47110816.
APPEND ls_sample TO lt_sample.

* prepare cl_salv_table
cl_salv_table=>factory(
  IMPORTING r_salv_table = lc_alv
  CHANGING t_table = lt_sample ).

* functions: sort, filter, export etc
lr_functions = lc_alv->get_functions( ).
lr_functions->set_all( abap_true ).

* optimal column size
lr_columns = lc_alv->get_columns( ).
lr_columns->set_optimize( abap_true ).


lf_listname = 'sample list'.
lr_display = lc_alv->get_display_settings( ).
lr_display->set_list_header( value = lf_listname ).
lr_display->set_striped_pattern( abap_true ).

lr_layout = lc_alv->get_layout( ).

* set the Layout Key
ls_key-report = sy-cprog.
lr_layout->set_key( ls_key ).

* set usage of default Layouts
lr_layout->set_default( abap_true ).

* set Layout save restriction
lr_layout->set_save_restriction( if_salv_c_layout=>restrict_none ).

* display the list
lc_alv->display( ).
You can find more articles about SAP here.